You open a cabinet and find the telltale signs: small dark droppings, gnawed packaging, a hole chewed through the corner of a box. Or you hear scratching at night behind the walls near the kitchen. The immediate question is not just how to deal with what is already there — it is how mice got in, where they are accessing your food and cabinets, and what will actually stop them from coming back.
This guide answers all of it. We cover whether mice can actually open cabinets, how they enter homes in the first place, every practical method for mouse-proofing your kitchen, how to identify and seal the entry points they use, how to eliminate an existing mouse problem safely, and the long-term habits that prevent mice from returning. If you have mice now or you want to make sure you never do, everything you need is here.
Quick Reference: Mice and Kitchen Cabinets
| Can mice open cabinet doors? | Yes — push-open cabinets easily; standard hinged doors with gaps are accessible |
| Can mice climb into upper cabinets? | Yes — mice climb vertical surfaces easily including cabinet exteriors |
| Smallest gap a mouse can fit through | 6mm (quarter inch) — the width of a pencil |
| Most effective prevention | Seal all entry points with steel wool and caulk, remove food sources |
| Best food storage to prevent mice | Airtight glass or metal containers — mice chew through cardboard and thin plastic |
Can Mice Open Cabinet Doors?
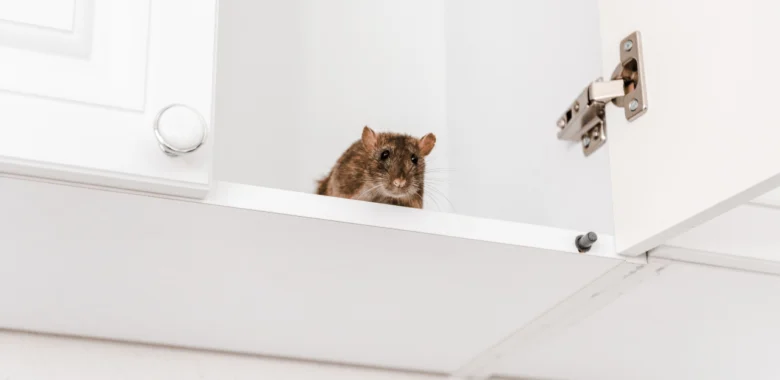
Yes. Mice can open certain types of cabinet doors, and the ones they cannot open fully, they can often squeeze through the gaps around.
Push-to-open cabinets — the magnetic touch-latch style common in modern kitchens — offer no resistance to a mouse. The mouse pushes the door with its nose or paw and the magnetic latch releases. These cabinets are designed to open with minimal force and a mouse weighing thirty to fifty grams applies more than enough pressure to trigger them.
Standard hinged cabinets with knobs or handles are physically harder for a mouse to open because a mouse cannot turn a knob. However, the gap between the cabinet door and the frame is typically three to five millimeters — and a mouse needs only six millimeters to squeeze its head through. Once the head fits, the body follows. Mice routinely access the interior of standard hinged cabinets not by opening the door but by squeezing through the gap around it, particularly at the corners where the gap is widest.
The interior of cabinets also provides ideal conditions for mice: dark, enclosed, stable temperature, close to food, and undisturbed for long periods. Once a mouse has identified food in a cabinet, it will continue returning and will work to find or maintain access.

How Mice Enter Your Home in the First Place
Before addressing cabinet access, it is worth understanding how mice enter the home. Mice found in your kitchen cabinets did not appear from nowhere — they found a way in from outside, and until that entry point is sealed, any mouse you remove will be replaced by others following the same route.
The house mouse (Mus musculus) — the species most commonly found in residential kitchens — can compress its body to fit through any gap its skull can pass through. The skull is approximately six millimeters in diameter. This means any gap, crack, or hole wider than a quarter inch is a potential entry point.
| Entry Point | Why Mice Use It | How to Seal It |
|---|---|---|
| Gaps around pipes under sink | Pipes penetrate the wall — gap around them is often 10-20mm | Steel wool packed in, then caulked over |
| Foundation cracks and gaps | Mice travel along foundation and find gaps at ground level | Hydraulic cement or masonry caulk |
| Gaps around doors and windows | Worn weatherstripping leaves gaps at corners | New door sweeps and weatherstripping |
| Dryer vents and utility openings | Unscreened vents are direct access points | 1/4-inch hardware cloth screen |
| Garage door gaps | Rubber thresholds degrade over time | New rubber threshold seal |
| Gaps where wall meets foundation | Common in older homes where settling creates gaps | Exterior caulk rated for masonry-to-wood |
The area under the kitchen sink is the single most common indoor entry point for mice in residential homes. Pipes for the hot and cold water supply and the drain pass through the cabinet back wall and into the wall cavity. The holes cut for these pipes are almost always larger than the pipe diameter, leaving a gap around each pipe that is usually sealed with foam or caulk during installation — but which degrades or was never properly sealed in older homes. A mouse following the exterior of the building finds the pipe penetration from outside and enters directly into the cabinet under the sink.
Signs You Have Mice in Your Kitchen Cabinets
Mice are nocturnal and cautious during daylight hours. Most people do not see the mouse itself — they see the evidence it leaves behind. Knowing what to look for and where to look allows you to catch a mouse problem early, before a pair of mice becomes a colony.
Signs of Active Mouse Activity
- Small dark droppings (rice-grain sized)
- Gnaw marks on food packaging
- Nesting material (shredded paper, fabric)
- Musky odor in enclosed spaces
- Scratching sounds at night
Where to Check First
- Back corners of the cabinet under the sink
- Behind the refrigerator and stove
- Inside lower cabinets near the floor
- Along the back walls of pantry shelves
- Inside drawers, especially rarely opened ones
Fresh droppings are dark and moist. Older droppings are lighter and dry. The presence of both indicates an ongoing infestation rather than a single isolated visit. The number of droppings is a rough indicator of population size — dozens of droppings in multiple locations suggests more than one mouse. Finding droppings in upper cabinets alongside lower cabinet evidence confirms the mice are climbing, which is typical behavior for house mice that have been resident for more than a few days.
How to Mouse-Proof Your Kitchen Cabinets
Mouse-proofing works at two levels: preventing access to the cabinet interior, and removing the food sources that make the cabinet worth accessing. Both are necessary. Sealing cabinets without eliminating the food attraction reduces but does not eliminate the problem, because mice will find other routes. Eliminating food without sealing entry points reduces incentive but leaves the access routes open for future infestations.
Seal the Pipe Penetrations Under the Sink
This is the most important single task. Open the cabinet under the sink completely and inspect every pipe that passes through the back wall. Use a flashlight and look closely at the gap between the pipe and the hole it passes through. Pack any gap wider than six millimeters with steel wool, then seal over the steel wool with expanding foam or silicone caulk. Steel wool is critical — mice can chew through foam and silicone alone, but cannot chew through steel wool. The combination of steel wool fill and caulk seal creates a barrier mice cannot breach.
Steel wool for this purpose is available at any hardware store. Use medium or coarse grade and push it firmly into the gap with a screwdriver handle. Pack it tightly enough that there are no visible gaps in the fill. Apply the caulk while the steel wool is in place to hold it and provide a smooth finish. Allow to dry fully before checking the effectiveness.
Seal Gaps Around Cabinet Back Walls and Floors
Inspect the interior rear wall of each base cabinet where it meets the floor. Gaps here — particularly in older kitchens where the cabinet toe kick does not seal completely against the floor — allow mice to enter from the wall cavity into the cabinet interior without ever being in the main kitchen space. Use a silicone caulk to seal any gap between the cabinet interior walls and the floor, and between the cabinet back panel and the wall behind it.
Install Childproof or Magnetic Locks on Touch-Latch Cabinets
Push-to-open cabinets require a physical barrier that mice cannot trigger. Cabinet locks designed for childproofing — the adhesive magnetic type that requires a key magnet to open — add sufficient resistance to prevent mice from opening touch-latch cabinets. They are inexpensive, leave no visible marks on the cabinet exterior, and require no drilling. For the duration of a mouse problem and for several months afterward until you are confident the entry points are sealed, these locks on all touch-latch food storage cabinets are a practical intermediate measure.
Switch to Mouse-Proof Food Storage
Cardboard boxes, paper bags, and thin plastic bags provide essentially no barrier to a mouse. A mouse can chew through a standard cereal box or a bag of flour in under a minute. Switching all dry goods to airtight glass or metal containers eliminates both the food access and the smell signal that draws mice to the cabinet in the first place. Metal tins and glass jars with rubber-sealed lids are the most effective. Hard plastic containers with screw lids provide good protection — mice can gnaw plastic over time but not easily or quickly.
The priority items to containerize: flour, sugar, rice, pasta, oats, cereals, crackers, nuts, seeds, pet food, and any dried goods sold in paper or light plastic packaging. Pet food is a particularly important item — bags of dry kibble are extremely attractive to mice and are frequently how a mouse problem in a cabinet begins.
Keep the Cabinet Under the Sink Clean and Dry
Moisture from slow pipe drips and condensation on cold pipes creates ideal conditions for mice — it provides water and promotes the growth of mold and bacteria that mice eat. Inspect the pipes under the sink monthly for drips or moisture, fix any leaks promptly, and consider placing a small humidity-absorbing product in the cabinet to reduce condensation. A dry, well-maintained sink cabinet is significantly less attractive to mice than a damp one.
Eliminating an Existing Mouse Problem
If mice are already present in your cabinets, sealing entry points traps some and prevents reinforcements, but does not eliminate the ones already inside. Removal requires active trapping or, in significant infestations, professional pest control.
Snap Traps: The Most Effective DIY Method
Classic wooden snap traps baited with peanut butter or hazelnut spread are consistently the most effective DIY mouse removal method. They work faster than glue traps, more reliably than electronic traps, and more cost-effectively than poison bait in a home with children or pets. Place them with the trigger end against the wall — mice travel along walls rather than across open floor space. Position them inside cabinets near droppings, at corners where mice have been active, and along the routes between the cabinet and any identified entry point.
Use more traps than you think you need. A single trap in a cabinet that has significant mouse activity will catch one mouse and then sit there while others continue operating. Place five to ten traps across the active area and check them daily. Reset immediately after catching. A well-baited trap in the right position will typically produce results within the first night of placement.
What About Poison Bait?
Rodenticide bait blocks and poison stations are effective but carry specific risks in kitchen environments. The primary concern is secondary poisoning: a mouse that has eaten poison becomes lethargic and is easily caught by pets or children before dying. A cat or dog that eats a poisoned mouse can be affected by the rodenticide. Additionally, a mouse that eats poison typically crawls into a wall cavity to die, where it decomposes and produces a persistent unpleasant odor for two to four weeks. In an active kitchen, this is a significant quality-of-life problem. Snap traps avoid both of these issues and are the better choice for most residential kitchen situations.
Cleaning Up After Mice
Mouse droppings and urine can transmit hantavirus and salmonella. Cleaning up after a mouse infestation requires specific precautions to avoid exposure to these pathogens.
Safe Cleanup After Mouse Activity: Step by Step
-
1
Ventilate for 30 minutes before beginning. Open windows and doors. Do not sweep or vacuum dry droppings — this aerosolizes the pathogens.
-
2
Wear rubber gloves and a face mask. Disposable gloves are adequate. N95 respirator is recommended in heavily contaminated spaces.
-
3
Spray droppings with a disinfectant — diluted bleach (1:10 with water) or a commercial disinfectant spray. Let soak for five minutes before wiping. This kills pathogens before removal.
-
4
Wipe with damp paper towels and dispose in a sealed plastic bag. Remove the bag from the home immediately.
-
5
Clean all surfaces in affected cabinets with disinfectant, including the shelves and interior walls. Wash any dishes or food containers that were stored in affected cabinets before using them.
Long-Term Mouse Prevention: Habits That Make a Difference
Sealing entry points and removing an active infestation addresses the immediate problem. Preventing recurrence requires a few consistent habits that remove the conditions that attract mice in the first place.
Take garbage out daily. A full kitchen bin is one of the most reliable mouse attractants in a home. Lidded bins help, but mice can get through most loose lids. Daily emptying and exterior bins with secured lids eliminate this attractant at the source.
Clean under and behind appliances regularly. Crumbs and food debris accumulate in areas that are rarely cleaned — under the refrigerator, behind the stove, and under the dishwasher. These become food sources that sustain mice between forays into cabinets. Pull appliances out quarterly and clean beneath and behind them.
Do not leave food on counters overnight. Fruit bowls, bread loaves, and open snack containers left on countertops overnight are feeding opportunities for mice that are active after dark. Store all food in containers or the refrigerator before bed.
Inspect the exterior perimeter twice a year. Walk around the outside of the house in spring and fall and look for new gaps, cracks, or entry points that have developed. Pay particular attention to areas where utilities enter the building, foundation corners, and anywhere pipes or cables pass through the exterior wall. Catching and sealing a new gap early is far less effort than eliminating an established infestation. If you notice any structural changes around the foundation that create new gaps, address them promptly.
Address outdoor attractants. Bird feeders, compost bins without secure lids, and woodpiles stored against the house all attract rodents that then find their way inside. Moving woodpiles away from the house, securing compost, and using no-mess birdseed that does not leave ground debris significantly reduces the rodent pressure on the home perimeter.
Frequently Asked Questions
Can mice really open cabinet doors?
Yes. Mice open push-to-open (touch-latch) cabinets easily by pushing with their nose. Standard hinged cabinets with knobs are physically harder to open, but mice typically access the interior through the gap around the door rather than by opening it — a gap of six millimeters at a corner is sufficient for a house mouse to squeeze through.
Can mice climb into upper cabinets?
Yes. House mice are excellent climbers and can scale vertical surfaces including cabinet sides, wall tiles, and exposed pipes. Upper cabinets are accessible from below via the exterior of the cabinet, from pipes running inside the wall, or through gaps in the back of the cabinet where it meets the wall. Upper cabinet infestations are less common than lower cabinet infestations but entirely possible.
What is the smallest gap a mouse can get through?
Six millimeters — approximately the diameter of a pencil. If a mouse can fit its skull through a gap, its flexible body follows. This means quarter-inch gaps around pipes, at the corners of cabinet doors, and at the base of walls are all potential access points. Effective mouse-proofing seals any gap wider than three to four millimeters to provide a meaningful safety margin.
What is the fastest way to get rid of mice in kitchen cabinets?
Snap traps placed inside active cabinets with peanut butter bait, checked and reset daily, produce the fastest results for most residential infestations. Use more traps than you think necessary — five to ten across the active area rather than one or two. Simultaneously seal the entry point they are using (usually under-sink pipe penetrations) to prevent new mice entering while the trapping occurs.
Are mice dangerous in kitchen cabinets?
Yes. Mouse droppings and urine can transmit salmonellosis and hantavirus. Food contaminated by mouse activity — even food in sealed packaging that a mouse has gnawed through — should be discarded. Dishes and containers stored in affected cabinets should be thoroughly washed before use. The CDC recommends treating any area with mouse activity as potentially contaminated and following specific cleanup protocols to avoid pathogen exposure.
How do I know if mice are coming from inside the walls?
Scratching sounds in the walls, particularly at night, indicate mice traveling through the wall cavity. This is very common — wall cavities provide warm, protected travel routes that connect the exterior of the building to interior spaces including cabinet interiors. The access point from the wall to the cabinet is typically the pipe penetration in the cabinet back wall. Sealing this penetration with steel wool and caulk blocks the route from the wall cavity into the cabinet even if mice remain in the walls themselves.
Mice in kitchen cabinets are a solvable problem with the right approach — seal the entry points, remove the food sources, trap what is already inside, and maintain the habits that prevent return. For more home safety and maintenance guides covering the pests, hazards, and situations homeowners regularly encounter, browse our Home Safety section.
Related Reading